css-cheatsheet

pointer-events

把值设置为none可以让元素不捕获事件,可以理解为让他看得见摸不着
源:应用举例及扩展

currentColor

是color属性的值,border: 1px solid currentColor; 继承自color

user-select

禁止选择文本

1
::selection { user-select: none; }

selection

可设置文字被选择时的样式

1
2
::selection { background: #FE6E66;color: #FFF;}
::-moz-selection { }

image-set

在不同设备像素比的屏幕下,自动加载2倍,3倍图

1
2
3
div { background-image: image-set( url(test@2x.png) 2x, 
url(test@3x.png) 3x );
}

object-fit

解决img图片变形问题, cover自适应裁剪,contain全包容

backdrop-filter

它可以实现 filter 的绝大多数效果,但仅对背景生效。background-color: rgba(255, 255, 255, 0.5);-webkit-backdrop-filter: blur(10px);

mix-blend-mode

实现photoshop里的各种图层叠加效果

text-transform

属性控制文本的大小写。uppercase,lowercase,capitalize

font-family

在 iOS 和 macOS 的 Safari 和 web view 中使用系统默认 UI 字体。/ 如果要兼容 10.10 请使用 -apple-system-font。/

1
.class{ font-family: -apple-system; }

backface-visibility

属性定义当元素不面向屏幕时是否可见。如果在旋转元素不希望看到其背面时,该属性很有用。

1
.class{ -webkit-backface-visibility: hidden; }

clip-path

clip-path inset图片剪裁
源:clip-path路径剪裁遮罩属性简介

contain

属性允许开发者声明当前元素和它的内容尽可能的独立于其他部分的 Dom 树。
源:5个你可能不知道的CSS属性

direction:ltr | rtl

检索或设置文本流的方向。

-webkit-font-smoothing

让页面里的字体变清晰

calc

百分数可以-分辨率。
在用easy Less时自动转换时会将calc内的表达式计算,解决方案如下片断二

1
2
*{width: calc(100% - 90px) } //片断一,正常情况
*{width: calc(~"100% - 90px")} // 片断二,easy less时

关于如何去掉手机浏览器都会给网页的onclick事件一个点击效果

1
*{-webkit-tap-highlight-color:rgba(0,0,0,0);}

现在很多for Mobile的HTML5网页内都有快速滚动和回弹的效果,看上去和原生app的效率都有得一拼。

1
div{ -webkit-overflow-scrolling: touch;}

去掉手机浏览器上表单的内阴影

1
input[type="button"],textarea {  -webkit-appearance: none;}

从左边飘过来的css代码

1
2
3
4
5
6
7
8
9
10
11
12
13
14
aside {
position: fixed;
top: 0;
left: 0;
width: 100%;
height: 100%;
transform: translateX(100%);
transition: 0.3s all ease-out;
background-color: #efefef;
padding: 1rem;
}
input[type=checkbox]:checked ~ aside {
transform: translateX(0);
}

超过多行时自动加省略号

1
2
3
4
5
6
.whitespace2{
display: -webkit-box;
-webkit-box-orient: vertical;
-webkit-line-clamp: 2;
overflow:hidden;
}

百分比失效

border-radius百分比失效
Android2.3.x
设置一个较大值,解决方案:border-radius:9999px

css的line-height属性会有2px的上移

placeholder属性设置的文字向上偏移的厉害 Android 机型,小于12px时更明显。
解决方案:line-height:normal,效果不太好,用padding撑也不太好,如果哪个大神有高招,还请指点一下

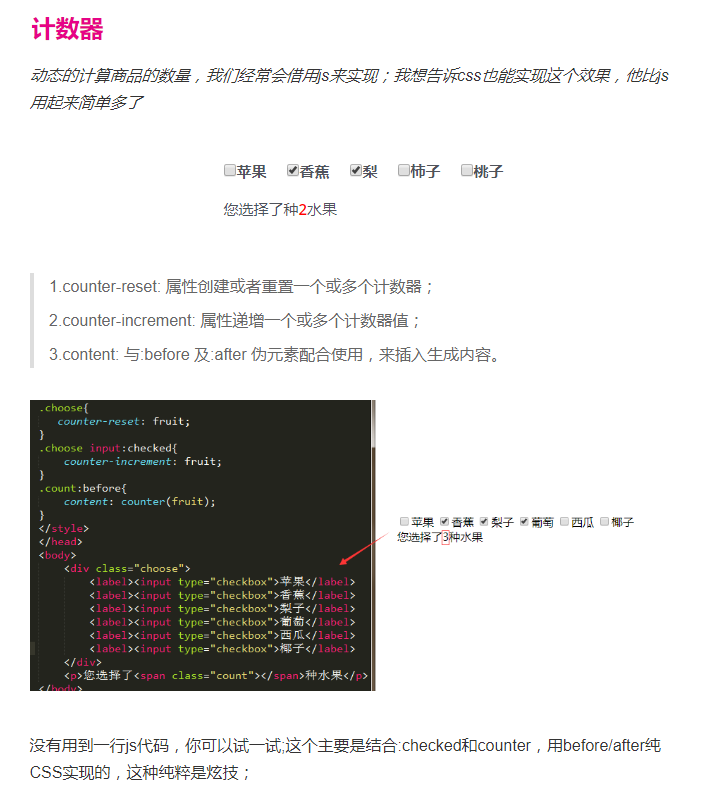
counter
perspective透视,视角

perspective这玩意是做3D效果的,但为甚我做demo楞没看出perspective加上去有任何3D。拜读过 张鑫旭 的博文后才了解perspective是透视(学美术,建筑的肯定懂,不懂得我也解释的不专业,个人理解为景深)。既然perspective是透视,从理解上说就应该用在场景样式上,场景有了透视元素就能做3D特效了。

perspective在Z轴上,而perspective是设置Z轴的长度。在css3中只有设置了perspective的值元素才会有Z轴,perspective为none元素则没有Z轴(就是2D元素)。

  • rotateZ:div围绕Z轴旋转,以div中心点为轴心旋转
  • rotateX:div围绕X轴旋转,以div横向中轴为轴心前后翻转
  • rotateY:div围绕Y轴旋转,以div纵向中轴为轴心左右翻转

参考:CSS3 3D transform变换,不过如此

1
2
3
4
5
6
7
8
9
10
11
12
13
14
15
16
17
18
<nav>
<a href="#">Home</a>
<a href="#" class="selected">Projects</a>
<a href="#">About</a>
</nav>
<main>Content area</main>
<nav class="left">
<a href="#">Home</a>
<a href="#" class="selected">Projects</a>
<a href="#">About</a>
</nav>
<main>Content area</main>
<nav class="right">
<a href="#">Home</a>
<a href="#" class="selected">Projects</a>
<a href="#">About</a>
</nav>
<main>Content area</main>
1
2
3
4
5
6
7
8
9
10
11
12
13
14
15
16
17
18
19
20
21
22
23
24
25
26
27
28
29
30
31
32
33
34
35
36
37
38
39
40
41
42
43
44
45
46
47
48
49
50
51
52
53
54
body {
padding: 40px;
font: 130%/2 Frutiger LT Std, sans-serif;
}
nav {
position: relative;
z-index: 1;
padding-left: 1em;
}
nav > a {
position: relative;
display: inline-block;
padding: .3em 1em 0;
color: inherit;
text-decoration: none;
margin: 0 -.3em;
}
nav > a::before,
main {
border: .1em solid rgba(0,0,0,.4);
}
nav a::before {
content: ''; /* To generate the box */
position: absolute;
top: 0; right: 0; bottom: 0; left: 0;
z-index: -1;
border-bottom: none;
border-radius: .5em .5em 0 0;
background: #ccc linear-gradient(hsla(0,0%,100%,.6), hsla(0,0%,100%,0));
box-shadow: 0 .15em white inset;
transform: scale(1.1, 1.3) perspective(.5em) rotateX(5deg);
transform-origin: bottom;
}
nav a.selected { z-index: 2;}
nav a.selected::before {
background-color: #eee;
margin-bottom: -.08em;
}
main {
display: block;
margin-bottom: 1em;
background: #eee;
padding: 1em;
border-radius: .15em;
}
nav.left > a::before {
transform: scale(1.2, 1.3) perspective(.5em) rotateX(5deg);
transform-origin: bottom left;
}
nav.right { padding-left: 2em; }
nav.right > a::before {
transform: scale(1.2, 1.3) perspective(.5em) rotateX(5deg);
transform-origin: bottom right;
}

input[range]自定义样式

美化滑动控件,需要完成以下的五个步骤:

  • 去除系统默认的样式;
  • 给滑动轨道(track)添加样式;
  • 给滑块(thumb)添加样式;
  • 根据滑块所在位置填充进度条;
  • 实现多浏览器兼容。

如果想要实现填充进度条的效果,在IE 9以上的浏览器中可以使用 ::-ms-fill-lower::-ms-fill-upper 来自定义进度条;在Firefox浏览器中则可以通过 ::-moz-range-progress 来自定义;而Chrome浏览器中不支持直接设置进度条,而达到填充的效果,所以首先针对Chrome浏览器来实现整个流程。

1
2
3
4
5
6
7
8
9
10
11
12
13
14
15
16
17
18
19
20
21
22
23
24
25
26
27
28
29
30
input[type=range] {
-webkit-appearance: none; /*1、去除系统默认的样式*/
width: 300px;
background: -webkit-linear-gradient(#61bd12, #61bd12) no-repeat, #ddd; /*设置左边颜色为#61bd12,右边颜色为#ddd*/
background-size: 75% 100%; /*设置左右宽度比例,可以通过js修改background-size到控制*/
border-radius: 10px; /*这个属性设置使填充进度条时的图形为圆角*/
}
/*2、给滑动轨道(track)添加样式*/
input[type=range]::-webkit-slider-runnable-track {
height: 6px;
border-radius: 10px; /*将滑动轨道设为圆角的*/
/*box-shadow: 0 1px 1px #def3f8, inset 0 .125em .125em #0d1112;*/ /*滑动轨道内置阴影效果*/
background: #ccc;
}
/*原始的控件获取到焦点时,会显示包裹整个控件的边框,所以还需要把边框取消。*/
input[type=range]:focus {
outline: none;
}
/*3、对滑块的样式进行变更*/
input[type=range]::-webkit-slider-thumb {
-webkit-appearance: none; /*1、去除系统默认的样式*/
height: 20px;
width: 20px;
margin-top: -7px; /*使滑块超出轨道部分的偏移量相等*/
background: #61bd12;
border-radius: 50%; /*外观设置为圆形*/
border: solid 0.125em rgba(205, 224, 230, 0.5); /*设置边框*/
box-shadow: 0 .125em .125em #3b4547; /*添加底部阴影*/
}
/*4、chrome浏览器滑块所在位置填充需要依赖js事件*/

如果要兼容Firefox浏览器,只需要把上述css代码中的 ::-webkit-slider-runnable-track 替换为 ::-moz-range-track ,就可以完成对轨道的美化了;

把css代码中的 ::-webkit-slider-thumb 替换为 ::-moz-range-thumb ,这是对滑块的样式进行改造;

而如果是要填充进度条就很简单了,不需要调用js了; 只需要新增如下的css代码即可

1
2
3
4
5
input[type=range]::-moz-range-progress {
background: linear-gradient(to right, #059CFA, white 100%, white);
height: 13px;
border-radius: 10px;
}

如果要想兼容IE 9以上版本的浏览器,对上述css代码要修改的地方稍微多了一些,下面先将针对IE 9+的css代码贴出来

1
2
3
4
5
6
7
8
9
10
11
12
13
14
15
16
17
18
19
20
21
22
23
24
25
26
27
28
29
30
31
32
33
34
35
36
37
38
39
40
41
42
43
44
45
input[type=range] {
-webkit-appearance: none;
width: 300px;
border-radius: 10px;
}

input[type=range]::-ms-track {
height: 25px;
border-radius: 10px;
box-shadow: 0 1px 1px #def3f8, inset 0 .125em .125em #0d1112;
border-color: transparent; /*去除原有边框*/
color: transparent; /*去除轨道内的竖线*/
}

input[type=range]::-ms-thumb {
border: solid 0.125em rgba(205, 224, 230, 0.5);
height: 25px;
width: 25px;
border-radius: 50%;
background: #ffffff;
margin-top: -5px;
box-shadow: 0 .125em .125em #3b4547;
}

input[type=range]::-ms-fill-lower {
/*进度条已填充的部分*/
height: 22px;
border-radius: 10px;
background: linear-gradient(to right, #059CFA, white 100%, white);
}

input[type=range]::-ms-fill-upper {
/*进度条未填充的部分*/
height: 22px;
border-radius: 10px;
background: #ffffff;
}

input[type=range]:focus::-ms-fill-lower {
background: linear-gradient(to right, #059CFA, white 100%, white);
}

input[type=range]:focus::-ms-fill-upper {
background: #ffffff;
}

参考:自定义(滑动条)input[type=”range”]样式

CSS Grid 布局完全指南

CSS Grid 布局是 CSS 中最强大的布局系统。与 flexbox 的一维布局系统不同,CSS Grid 布局是一个二维布局系统,也就意味着它可以同时处理列和行。通过将 CSS 规则应用于 父元素 (成为 Grid Container 网格容器)和其 子元素(成为 Grid Items 网格项),你就可以轻松使用 Grid(网格) 布局。

参考:CSS Grid 布局完全指南 写给自己看的display: grid布局教程

css 渐变生成加号减号三角

1
2
3
4
5
6
.tri {
width: 6px; height: 6px;
background: linear-gradient(to top, #ddd, #ddd) no-repeat, linear-gradient(to right, #ddd, #ddd) no-repeat, linear-gradient(135deg, #fff, #fff 6px, hsla(0,0%,100%,0) 6px) no-repeat;
background-size: 6px 1px, 1px 6px, 6px 6px;
transform: rotate(-45deg);
}

参考:CSS3 linear-gradient线性渐变实现虚线等简单实用图形

css 去掉google自动填充的黄色背景

1
2
3
input:-webkit-autofill, textarea:-webkit-autofill, select:-webkit-autofill {
-webkit-box-shadow: 0 0 0 1000px white inset !important;
}

css :focus-within

元素自身或者它的某个后代匹配:focus伪类

1
2
3
div:focus-within {
background: cyan;
}

文字渐变色

IE不支持,需要容器为行内(块)元素

1
2
3
4
5
6
label {
color: #0B77FF;
background-image: -webkit-linear-gradient(0deg, #0B77FF, #39CAF9);
-webkit-background-clip: text;
-webkit-text-fill-color: transparent;
}

边框渐变色

1
2
3
4
5
6
div {
border: 3px solid #3ACBF9;
border-image: -webkit-linear-gradient(270deg,#3ACBF9,#1081FF) 10 10;
border-image: -moz-linear-gradient(270deg,#3ACBF9,#1081FF) 10 10;
border-image: linear-gradient(270deg,#3ACBF9,#1081FF) 10 10;
}

filter: hue-rotate

色调旋转滤镜实现按钮颜色更改

1
2
3
4
5
button {
filter: hue-rotate(90deg); /* 90度旋转 */
filter: hue-rotate(.5turn); /* 180度旋转 */
filter: hue-rotate(3.142rad); /* 3.142弧度旋转,近似一圈,也就是360度 */
}

参考:CSS filter:hue-rotate色调旋转滤镜实现按钮批量生产

scroll-behavior:smooth

scroll-behavior:smooth 写在滚动容器元素上,可以让容器(非鼠标手势触发)的滚动变得平滑。

1
2
3
4
// 等同于
target.scrollIntoView({
behavior: "smooth"
});

如果我们的网页已经通过CSS设置了scroll-behavior:smooth声明,则我们直接执行target.scrollIntoView()方法就会有平滑滚动,无需再额外设置behavior参数。

CSS scroll-behavior和JS scrollIntoView让页面滚动平滑

单位尺寸

  • vw (viewport width) - 浏览器窗口宽度的1%。
  • vh (viewport height) - 同上,只不过用来描述高度。
  • vmin and vmax 设置介于vh和vw之间的最大最小值。

@Supports

检测某些设定是否被浏览器所支持,并非所有的浏览器都支持它,但是你仍然可以使用它作为基本的检测手段

1
2
3
4
5
6
7
8
9
10
11
12
13
@supports (display: flex) {
div { display: flex; }
}

/*You can check prefixes*/
@supports (display: -webkit-flex) or (display: -moz-flex) or (display: flex) {
section {
display: -webkit-flex;
display: -moz-flex;
display: flex;
float: none;
}
}